Photography magazines Festive bread “two chocolates” from chef Alexander Seleznev
This list lists (in alphabetical order) various periodicals (specialized magazines, etc.) by...
Similar articles
It is prepared in the following proportion: 1 tsp of rotted humus + 1 tsp of high-quality garden or forest soil + 1 tsp of sand. This composition must be mixed and then sifted using a sieve with cells of about 8 mm. Add 100 g of ordinary chalk (which is used at school) or crushed egg shells (also 100 g) to each bucket of prepared soil. 100 g of ash is poured into the same bucket.
Use a timer and a twilight sensor to extend daylight hours for plants;
After the roof, we fasten the walls of the shelter. Lastly, we install the ends, cut through the doors and vents. We finish the glazing by sealing all the cracks with silicone sealant or construction foam.

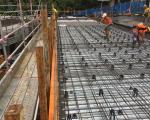
We begin assembling the frame by installing the support columns of the side and end walls, or in the case of an arched structure, installing the arches. It is better to weld the frame to the foundation guides - it will be stronger.
Profile pipes
Let’s make a reservation in advance: this article will consider the construction of a polycarbonate greenhouse. Film greenhouses are built in almost the same way, but this is a topic for a separate article.
The pipe must be welded to the wall of the tank, which will become the future chimney. The lid, which needs to be made from the top of the cylinder, should have its edges secured. To make cleaning the oven more convenient, the outer sides should be supplemented with two studs, which will make it possible to make a base.
shovel.

http://youtu.be/x08X1OBwfhs
Pay attention! When building a greenhouse as a “house,” be sure to measure the diagonals along the top. The deviation should not exceed 2 cm. Advice! Before installing the arches of the arched structure, draw the first and last arches on the polycarbonate with a marker. This will make it easier to make the ends.

So, we build a polycarbonate greenhouse with our own hands.
http://youtu.be/ZPylmcmvQZ8
The internal structure of a greenhouse or hotbed should provide the most favorable conditions for the development and maturation of the plant. The placement of beds, shelving, equipment and inventory is carried out taking into account creating convenience for the gardener’s work.
The height of the beds also affects the yield. They should rise above the ground level by at least 30-60 cm. The soil at an elevation warms up faster in the spring due to the sun's rays and warm air currents. It is also more convenient to care for plants planted at this level. A fertile layer of greater thickness contributes to better development plants.
In a greenhouse, heating occurs naturally, but in a greenhouse you will have to build additional heating elements that must maintain a temperature of 13 to 25 ° C.

Soil for cucumbers can be prepared as follows:
The width of the beds in the greenhouse should not exceed 1 m;
In general, the polycarbonate greenhouse is ready. Now all that remains is to equip it from the inside.
We weld the upper and lower frame trims. In an arched structure there are frame lintels. At this point, the frame of the arched structure is already ready. In other structures we make a roof.
Galvanized profiles
Greenhouses inside are often equipped with stoves with a heat exchanger, which also serve for irrigation. The structure can be made using a pair of barrels, in the first of which combustion will take place, and the second will serve as a heat exchanger.
It is important to equip the greenhouse with an additional heating system if the structure is intended to be used in winter.
Every summer resident thinks about the question of how to equip a greenhouse.
If you are planning to plant seedlings of early ripening crops in a greenhouse, you need to protect the plants from lower temperatures. In this case, the height of the bed is made at least 80 cm, and fences made of boards are installed for insulation.
Unlike a greenhouse, a greenhouse is a more permanent structure for growing lemons, tall cucumbers, tomatoes, flowers and other plants. A greenhouse is a small-sized structure, most often used for preparing seedlings that will subsequently be planted in open ground. Only early-ripening crops (radish, lettuce, etc.) undergo the entire development cycle in a greenhouse.
VseoTeplicah.ru
Option 1: 4 hours of humus + 6 hours of loamy soil;

The width of the passages between the beds should be sufficient for the passage of a small wheelbarrow;
Arrangement of a polycarbonate greenhouse inside is a very important stage of its construction.
Before installing the rafters, you should consider the following point: if you plan to irrigate using the sprinkler method, it may be necessary to lay transverse beams to secure the irrigation system. If the linear dimensions of the greenhouse are relatively small (up to 6 m on one side), then there is no special need for beams because Irrigation and lighting systems are mounted on cables.

When choosing the design of a future building, first of all you need to correctly assess your capabilities. So, for example, if you do not have access to a pipe bender and the skills to bend a profile pipe with large radius arcs, then it is better to forget about the arched and, especially, spherical design. If your budget is limited, then it is also better to immediately abandon aluminum profiles.
To obtain a heating structure, you will need 2 barrels that have thick walls. The capacity of one barrel should be 200 liters, the second - 50 liters. Square-shaped washing machine casings are ideal for this.
So, if you decide to build a massive wood-burning stove, it is preferable to build it with a hog, which is a horizontal pipe with a rise. In order to build such a stove, you need to use 2 iron pipes, a couple of iron plates from stoves and about 400 pieces. kiln brick.

Aluminum profiles
For ease of selection, we list all possible greenhouse designs:The top of the barrel should be cut off. From the smaller one you need to make a lid, securing the edges with reinforcement. Next, you should weld the handle and make legs from 3 corners, the length of which should be 12 cm.
If the arrangement of a polycarbonate greenhouse requires the presence of a furnace, you will first need to equip the base for it, which will be a monolithic structure. The inside of the greenhouse can be equipped with a concrete foundation, which can be replaced with two slabs firmly connected to each other, using a pipe frame as a connection.
Arranging a polycarbonate greenhouse inside is very important. It is not enough to choose the right material for a building. And even if you decide to use polycarbonate - a material that can create an ideal microclimate, optimal levels of humidity and temperature - there must still be the correct number of beds in the greenhouse.
Not only the location and height of the beds is important, but also their preservation of the given shape. To prevent the soil from crumbling, use sides made of different material, delimiting the rows. More often, boards are used for this, but this material rots quickly and only lasts one season.
Option 3: 2 parts humus + 1 part peat + 4 parts loamy soil + 1 part sawdust

Heating device;
Advice! Tighten all necessary cables and braces before starting glazing.
. High price. Mostly sold in sets. They do not oxidize or rot. Low availability when replacing failed parts with your own hands.
Single slope

Using a grinder, you should cut a partition from a sheet of metal to mount the camera. You need to cut a 6cm hole in the center. Next, you need to insert a slightly smaller tank inside, in which you have to drill a hole equal to 6 cm. The partition should be laid in the shape of a triangle of rods. The support should have a height of 15 cm, this stand should be installed on the bottom of a larger barrel.
The top of the firebox should be equipped with a pair of pipes that will allow air to pass inside. The draft will be created due to the rarefied air in the greenhouse, which will be used to burn wood. It is important to ensure that the cleaning door is tightly closed. From the greenhouse, air will pass into the blower chamber through side pipes that will connect to the channels; air will enter the latter through the air intake, warming the soil in the beds located on the sides.
After all, an excess of them can cause negative mutual influence of plants, and a deficiency will make the greenhouse a structure that takes up extra space on the site and does not use its full potential. So, as a rule, there are two beds in a greenhouse, and the path left between them should be such that a wheelbarrow could be driven along it. If you can fit three beds in a greenhouse or greenhouse, the middle one should be the widest, since it will have two-way access.
In the factory version, the sides are made of aluminum. They are sometimes included with the purchased prefabricated greenhouse. They can last for several decades. For these purposes, slate and metal profiles are also used, and old car tires are used.
It is necessary to arrange the inside of the greenhouse taking into account the purpose of its use. The room can be planned for growing vegetables in the ground or preparing seedlings on shelves or in pots. It can reach three or more meters in height.
It is advisable to steam the finished mixture as described above.
We hope that our article will help you successfully build a polycarbonate greenhouse with your own hands.
Lighting manufacturing;
We weld the roof rafters and weld in the necessary spacers. The installation of rafters should begin with the two outermost ones. Then a thread is stretched between them to control the height of the others. The installation pitch of the rafters under the polycarbonate roof is 60 cm.
A lot depends on the correct choice of location for the greenhouse. This includes the amount of light and heat that the plants will receive, the ease of movement between the house and the greenhouse, the ease of supplying water and electricity, and much more.
- usually this form is used in wall-mounted greenhouses;
VseoTeplicah.ru
http://youtu.be/c_loKQRz9VY

A water tank should be placed above the firebox, which will ensure the availability of warm water in early spring, which can be used for irrigation, and on hot days this water will become a source of additional moisture for peppers and cucumbers. This stove is serviced from the street.
The best height of the beds - from 30 to 60 cm - will allow the soil to warm up quite quickly.
The greenhouse is best placed in a well-lit place, with one of the long sides facing south. It is advisable to have bushes or other buildings near the north side for protection from the wind. Proximity to a garden, running water and electricity is also of no small importance.
Gable

Under the partition you need to make a box necessary for collecting combustion products. For a box in the wall of a larger tank, you need to cut a hole 30x13 cm. You need to weld the box to the hole, and weld a pipe into its central part. Arranging a greenhouse with such a design will not only heat it, but also provide watering.
The greenhouse can be equipped with another version of the stove, which will operate on wood and wood chips. This design includes a fuel compartment, above which there is a second bottom, a hole with a door, and also a blower. The stove has a lid and a chimney with a valve. You can load fuel into the stove to 2/3 of the volume of the firebox. In order to equip a greenhouse with such a stove, you should use a thick-walled pipe with a diameter of 40 cm.
Building a polycarbonate greenhouse with your own hands is, in general, not difficult if you have basic construction skills. But what to do if you have the skills, but have never had to build greenhouses? Then our tips on building a polycarbonate greenhouse will help you.

To speed up the growth of plants, the beds in the greenhouse are “insulated” by equipping a kind of “cushion”. It is an organic mass that releases heat during decomposition. Horse manure has the best heat release properties.
Arched

If we talk about the greenhouse heating system, most work on solar heating, but sometimes stove heating is also necessary (for greenhouses used in industry). The mentioned heating option can be replaced with a heated floor system, which will save space.
Components such as finely chopped wood chips, food waste (potato peels, peelings of other vegetables, etc.) and sawdust are used to make the “pillow.” The composition is laid in three layers in the order listed.
The layout of the beds. Option 1.

In the photo of the greenhouse inside you can see examples of different shelving arrangements. This is because each owner adjusts their height to his own height. That's why general rule for shelving structures, only the width is important: it should not exceed 95 cm if it is located against the wall, and 1.5 m if it is in the center. Shelves of greater width are inconvenient, since you cannot reach the outermost plants.
Based on the size of the greenhouse, you can divide the land into 2-3 beds. The maximum width of one bed is 1.2 m. With this width it is convenient to care for plants while standing on the path. If the bed is wider, then in order to reach distant plants, you will be forced to step on the soil, thereby compacting it. And neither you (you will have to move the soil more often) nor the plants need compaction (air circulation in the soil layer worsens, and the roots lack oxygen). Therefore, plan the bed based on your own height: if you can reach a meter radius with a hoe, make the bed one meter long. If you reach less, do less.

The internal structure of a polycarbonate greenhouse is a topic for a separate article.
Cut the necessary fragments from the sheets. It is better to cut the fragments with a margin of 1-2 cm; if necessary, they will be trimmed, and if there is not enough material, it will be a shame.
Pay attention! Polycarbonate bends only with a certain radius, which depends on its thickness. Therefore, when calculating the dimensions of an arched structure, pay special attention to this.
– a convenient form for quick construction of greenhouses and reducing the amount of polycarbonate trimmings;
B general view construction of a polycarbonate greenhouse consists of the following steps:
After this, you can make the bottom of the stove, for which you need to cut a circle out of steel so that it has the same diameter as the firebox. In order to maintain the dimensions, you should make markings by placing the pipe on a sheet and circling it with a marker. The circle can be obtained using a grinder. In the central part of the circle you need to make a hole of 8 cm. The next step is to cut approximately 50 longitudinal lines in the pipe, the diameter of which can vary from 0.8 to 1 mm.
boards;

The soil of the greenhouse must be fertilized, retain water well and be free from insect pests. The prepared soil composition can be purchased at specialty store or cook it yourself. To do this, mix garden soil, river sand, humus and peat in a ratio of 1:1:2:5. To improve the quality of the greenhouse soil, this mixture is added to the soil at a rate of 3 kg/m3
In narrow and long greenhouses, beds about 1 m wide are placed on the sides, leaving a convenient passage for caring for plants. If the transverse size of the room does not allow making the paths in the greenhouse comfortable enough, it is better to sacrifice the width of the beds. Even if there is not enough space for the third row of beds in the greenhouse, the first two can compensate for this with a larger harvest. With less shading of plants, they will receive a larger portion of light.
And choose the height this way: measure the height of the work surfaces in the kitchen. If you are comfortable cooking food at such a height, then it will also be okay to tinker with plants. The greenhouse can have shelves at a different height, because the space up to the ceiling allows you to place several rows. But the row where you will move the plants, replant, etc. must correspond to your height, otherwise back problems will not be avoided.
In small greenhouses, two beds are arranged along the length of the structure, and a path is left in the middle. The minimum width of the path is half a meter. This is enough to transport crops and weeds in a wheelbarrow, carry water in buckets without clinging to the plants. You can, of course, make a meter-long one, but then a lot of useful space will disappear. Try not to go beyond 50-70 cm.
A greenhouse made of polycarbonate is a fairly light structure, so it does not require a massive foundation. After marking, we dig trenches 40-45 cm deep and 25-30 cm wide. The formwork for pouring should be raised above ground level by 30-50 cm.

Polygonal
Choice of building design;
Then you can insert the pipe into the bottom of the furnace and weld the elements. Next, you need to make covers from steel; this element can have a round or polygonal shape. At its central point, a hole should be made equal to the diameter of the pipe so that the roof can fit flush onto the pipe. Then you need to make another hole, placing it closer to the edge, which will ensure oxygen enters the oven.
pipes;
Another composition that increases the nutritional properties of the soil is mixed from straw cuttings, manure and decomposed peat (1: 1: 2). 2 kg of sodium chloride, 3 kg of superphosphate and 300 g of urea per 1 m3 are also added to the mixture. The resulting fertilizing is poured in a layer of up to 18 cm, then garden soil is added until the height of the bed reaches 25 cm. Before planting seedlings, you can additionally fertilize the soil with superphosphate (30 g/m3) and sodium sulfate 20 g/m3.
Three beds with two aisles. A more convenient option for processing the outer rows, but inside the greenhouse, the paths take up even more space. The middle row can be made 1.5 m wide, the side rows - no less than 45 cm and no more than 95 cm. The width of the passage should be at least 60 cm, it is better to pave it with boards or bricks.
There can be 1 or 2 passages. The width depends on whether you will walk in the greenhouse with a wheelbarrow or not. For walking, 40 cm is enough, for a wheelbarrow - at least half a meter.

If width allows, divide the space into three beds. At the same time, maintain the proportions: near the walls of the greenhouse, the beds should not be more than a meter wide, and the central one can be made one and a half meters wide. There will be passages on both sides of it, so you can reach the plants in any case. The passages can be made the same, half a meter each, but then a whole meter of space is “wasted.” If you make it narrow, you won’t be able to squeeze through with a wheelbarrow. Make a compromise: make one passage (closer to the exit) large, and the second narrow, only for walking. To make it convenient to transfer weeds to the wheelbarrow from any corner, make 1-2 transverse passes in the central bed. To do this, place a board or a couple of bricks directly on the soil.
It is better to place the heating boiler inside, and the fuel tank outside the room;
Advice! First draw the cutting of the sheets on paper.
http://youtu.be/UPt9rBIbW-4
A wide bed in the middle and two narrow ones at the edges. This placement increases the usable area compared to the previous option, but the greenhouse or greenhouse in this case must have a larger width.
To germinate seeds, a small area with lighting is equipped in one corner and insulated with glass.

In rack greenhouses it is worth setting aside space for plants that you will isolate from the rest for a while. This is especially true for indoor plants. The purchased “newbie” is not placed with everyone else, because there is no guarantee that the plant is not sick or the soil is not contaminated with pest eggs. Therefore, it is necessary to wait a certain period of time after placing the flower in the quarantine zone. This should be a small area on a shelf that can accommodate 1-2 potted plants, fenced on all sides with glass. An ordinary 100 liter aquarium is very convenient for this purpose. Be sure to place it in the most shaded area so that the plants do not burn from the heat. The top of the aquarium should be tightly closed with a lid. Sometimes you will have to ventilate the quarantine zone. At this time, it is better to remove the aquarium from the greenhouse to exclude the possibility of infection.
If you have already decided on a greenhouse, then the beds must be created in such a way that the soil is excellent, the water does not stand, and frost cannot reach the seedlings through the ground. Only raised beds have these qualities, the minimum height of which from the surface of the earth is 20 cm. How to make them?
oteplicah.com
Before winter it is necessary to pressure test the heating system;
Pay attention! One of the ends should be sealed with perforated tape.
Tree
Assembling the frame;
cement;
The height of the shelving is decided by the gardener based on his own convenience. The recommended width of the shelves is up to 90 cm. When the rack is located between two tracks - up to 150 cm. It is important to ensure the stability of the structures and the safety of the tracks.
Landing across a slope. If the greenhouse soil has a slope, the beds are arranged in a transverse direction. This arrangement is effective due to the uniform incidence of sunlight on the plants.
After a couple of weeks, the pot is taken out and placed on a common rack.
On the sides of the paths it is necessary to make a fence from boards, the width of which is 25 cm. It will serve as a border for the soil, will not allow it to crumble, and it is more convenient to care for the raised bed. The boards are placed on edge, pegs are driven in nearby, which will hold the curb in a vertical position, preventing it from moving under the pressure of the bulk earth. You can nail the boards to the support, or you can drive pegs on both sides of the board.
For lighting it is best to use special lamps (sodium, high pressure);
We screw the polycarbonate to the greenhouse frame. You should start from the roof and from one end to the other. To connect the sheets together, be sure to use a special connecting profile.
Arrangement of a greenhouse may involve installing a sawdust stove, which will be extremely profitable option, because fuel is a cheap material, and because the stove is easy to make from what is available, such as pipes, barrels and gas cylinders. The latter option will also be the most convenient, since a conical pipe will not be required to put fuel into the cylinder, and cleaning the stove from combustion products will be more convenient. In order to equip a greenhouse oven inside, you should use gas cylinder, whose walls are 5 m.
sand;
A separate quarantine zone is set up in the rack greenhouse. Only received plants are placed in it for up to 2 weeks. Seedlings are observed to identify diseases and determine the “purity” of the soil. For quarantine, a small area of the rack is allocated for several pots. The plants are hermetically sealed with glass; you can use an old aquarium for this.
In small greenhouses, two beds with one aisle are usually arranged. The width of the path should ensure free movement of the wheelbarrow. If the plants being grown are not tall, the beds are traditionally directed from north to south. Tall crops are planted in rows from east to west. With this direction, the low morning rays of the sun penetrate through the rows and illuminate the bushes evenly.
If you attach a small vestibule to the greenhouse, it will act as an air gap between the air from the street and the greenhouse air, and the place where equipment is stored. Place a cabinet there that can be locked with a key, and hide liquid fertilizers, preparations for exterminating pests, etc. This way you isolate harmful “chemicals” from children and pets. The cabinet can also be placed under the shelves if a vestibule is not provided.
Now all that remains is to fill the bed with soil. Light greenhouses are suitable for greenhouses, with good soil ventilation, which do not contain weed seeds and harmful bacteria, but contain many useful substances. The most convenient option would be purchased soil. You will immediately buy it for the type of vegetables that will sit in the garden. If this option is expensive, prepare the soil yourself, deciding in advance which vegetable will grow where. For different types plants soil mixture should be different.
All electrical connections must be sealed;
Pay attention! To prevent the self-tapping screws from pushing through the polycarbonate, use special washers.
The frame is the main part of the greenhouse. A lot, if not everything, depends on its strength and stability. Therefore, you need to be very careful in assembling it.
Interior arrangement.
teplicamig.ru
To begin with, you should cut off the top of the balloon, from which you can later make a lid. In the upper part you need to cut a 10 cm hole necessary for installing the pipe, the lower part needs to be equipped with a hole whose diameter is 5 cm. It is also necessary to strengthen the perforated pipe here. The top should be hermetically sealed.
The arrangement of the greenhouse inside is quite important stage in the life of every gardener. The comfort of growing the crop and the practicality of further caring for it directly depend on the correctness of the work carried out. It is important to understand that the arrangement will take a lot of time. Therefore, you need to figure out how to properly irrigate, what distance to place between the beds, where to install heaters, and much more.
A greenhouse is a space that is intended for growing plants, as well as for preparing crops for planting in open ground. It is important to properly organize the greenhouse inside, taking into account its size and the needs of the gardener. Inside the premises, certain rules must be observed temperature regime, humidity level. If you follow the basic recommendations, tips and tricks during the work, then it is possible to grow several types of plants in one greenhouse, using the available space as intelligently as possible.
Since greenhouses vary not only in size, but also in purpose, the internal arrangement will also differ significantly. For example, in some it is necessary to create beds, in others it is necessary to arrange shelving. If necessary you can add optional equipment, which will significantly facilitate the process of growing crops.
Advice! If necessary, you can see the interior arrangement of a polycarbonate greenhouse in the photo.

Before you begin planning the interior of the greenhouse, it is recommended to consider some important rules:

The inside of the greenhouse should not only look beautiful, but also be as comfortable as possible. In addition, it is worth focusing on the cardinal directions, which significantly affects the level of yield. The optimal solution is to arrange the beds inside the greenhouse along an east-west line, as a result of which the crop will receive a sufficient amount of sunlight throughout the day.
It is important not only to look at the design of the greenhouse inside in the photo, but also to understand how wide the beds should be and how many of them should be made:
When arranging a polycarbonate greenhouse 3 by 6 m inside, you can make 3 beds 70 cm wide and 2 paths 45 cm wide.
Advice! If the greenhouse is narrow, two meters high, then it is recommended to make 2 beds of 75 cm each and one path in the middle.

In the process of arranging beds inside a polycarbonate greenhouse, everything must be done in such a way that the soil does not crumble after irrigation. Sides are used for these purposes:
The deeper the sides are in the ground, the better this will affect the crop being grown.
Attention! The height of the side can reach 4 cm - this will be quite enough so that during the process of caring for the crop inside the greenhouses, the soil does not crumble from the beds.

You can decorate the inside of the greenhouse not only with sides and a beautiful arrangement of beds, but also with paths. If necessary, the paths inside the greenhouse can be covered with gravel or crushed stone, and then the following types of materials can be laid on top:
The most durable option is considered to be a concrete screed, which can be used to pour paths between the beds inside the greenhouse. In addition, there will be much less weeds.
Every gardener, having a greenhouse at his dacha, wants to use it to the maximum. Even if you plan to plant in a 3m by 6m greenhouse, the planning must be done correctly. Separation of crops is necessary, since not all plants can be adjacent to each other. For example, tomatoes and bell peppers prefer sparse irrigation and fresh air; cucumbers require regular watering and high level humidity.
In order to be able to grow several different crops simultaneously in one greenhouse, it is necessary to create favorable conditions for them, namely, to divide the space using partitions for these purposes. Curtains made from polyethylene film or polycarbonate sheets. To understand exactly how the interior decoration of the greenhouse will look, you can look at the photo.

Today, there are a large number of options, thanks to which it is possible to intelligently think through the layout inside 3x4 m, 3x6 m greenhouses. If the available space is used as competently and correctly as possible, then the process of caring for the crop can be significantly simplified. In order to increase the level of productivity, it is worth taking care of heating, the presence of shelving, heating, and an automated irrigation system. If necessary, you can equip the greenhouse inside with your own hands, without resorting to the help of specialists.
It is impossible to imagine setting up a home greenhouse without a drip irrigation system, which greatly facilitates the process of watering the crop. It is also recommended to take care of this system at the beginning of designing a greenhouse in order to avoid unforeseen issues and problems in the future. If you do all the work correctly, then caring for the plants will be very easy, and it will take a minimum amount of time.

Additional lighting inside the greenhouse is required when daylight hours become short and the seedlings do not receive the amount of sunlight necessary for growth and development. When choosing lighting, it is recommended to give preference to multispectrum lamps that have blue ultraviolet radiation. In a specialized store you can purchase LED, fluorescent and gas-discharge lighting devices.
Since the main thing in any greenhouse is heat, in addition to solar heat, additional heating will not hurt. Many experts recommend using several types of heating to arrange the inside of a greenhouse:
It is important to understand that you need not only to obtain heat, but also to retain it inside the greenhouse. That is why this issue should be given due attention at the design stage of a greenhouse made of polycarbonate sheets. First, it is recommended to first look at the photo on how to make a greenhouse inside as competently as possible.

It is important not only to look at the photo on how to properly decorate the inside of the greenhouse, but also to equip it with everything necessary. Thus, a ventilation system together with heating is required when it is planned to grow crops quite early or it is necessary to significantly increase the yield level.
A ventilation system is required in the following cases:
In most cases, artificial ventilation is used in conjunction with stove heating. For these purposes, large fans are used, which are placed in close proximity to the heat source. This approach allows you to disperse heat throughout the greenhouse.

Using shelving inside the greenhouse allows you to make maximum use of all available space. In addition, it becomes possible to grow both tall and short types of crops.
If you plan to grow seedlings on racks, then you should take into account the following advantages:
When arranging the shelving, it is recommended to take care of the concrete base first. This is due to the fact that the weight of the rack along with the containers for seedlings, which are filled with soil, will be quite large, as a result of which the soil under the structure will begin to sag.

Important! For clarity, you can see what the arrangement of shelving inside the greenhouse looks like in the photo.
The arrangement inside a 3 m by 8 m greenhouse must be done correctly so that caring for the crop in the future does not cause difficulties. Any type of building material can be used to make shelving. In addition, you can independently weld a durable metal frame at home or use timber.
For horizontal shelves, boards are used that are pre-treated with special protective compounds that prevent the appearance of mold and mildew during operation. It is recommended to determine the distance between shelves and their number based on the maximum growth of the crop. Thus, if we consider a greenhouse whose height is 2 m, then a rack of 6 shelves can be placed inside.

The improvement of the greenhouse inside, the photos are presented below, should come first. Since the most important thing is to use the available space correctly, some gardeners, when setting up greenhouses, install shelving above the beds inside. It is precisely because of space saving that multi-tiered and suspended structures appear. Such structures can be the same size or taper from bottom to top.

When arranging a greenhouse inside with a width of three meters or more, you can take care of the presence of a quarantine zone. For these purposes, aquariums with a volume of 100 liters or more are used, into which seedlings susceptible to diseases are placed. Such a container should definitely be placed in the darkest corner so that direct sunlight does not harm the leaves of the seedlings. If you isolate infected plants in a timely manner, you can prevent mass infection of all crops.
Another important point, which can be implemented in the process of planning a greenhouse at the dacha 3 m by 8 m - vestibule. In the future, the vestibule can be used for storage gardening tools. It is very inconvenient to constantly carry everything you need to care for your crop from home or a barn to the greenhouse; it is much more convenient and comfortable when everything you need is at hand. To do this, it will be enough to fence off a small space at the entrance to the greenhouse where you can place shovels, rippers, fertilizers, gloves, and a hoe.
For maximum convenience, during the internal arrangement of a polycarbonate greenhouse, it is recommended to install special fasteners for fixing the cuttings of working tools, which will allow you to properly use the free space.
Today, there are a large number of options for arranging the inside of a greenhouse with your own hands, as a result of which you can get confused. Before you begin arranging the space, you need to take appropriate measurements and decide what crop will be grown. Only after this can you begin installing shelving or arranging beds. In order to properly equip a 3x6 m polycarbonate greenhouse inside, it is recommended that you familiarize yourself with already implemented projects.


Arrangement of the greenhouse inside is possible with your own hands without the involvement of third-party specialists. In this case, the main thing is to understand exactly what crops will grow and what dimensions the greenhouse has. Based on these parameters, you can easily prepare a seat and make paths of suitable width. If necessary, additional equipment can be installed in the greenhouse - lighting, heating, drip irrigation system. Some gardeners decide to make a vestibule, a quarantine zone - if space allows it.
Having a greenhouse does not guarantee you a good harvest - its volume is based on your work and careful care of the crops. Correct planning, provision of comfortable conditions and timely watering of plants - all these factors affect their fruiting and health. To ensure this, it is necessary to rationally arrange the inside of the greenhouse.
Regardless of what material your greenhouse is covered with and what dimensions it has, when arranging it you should be guided by certain rules:
How to rationally and correctly organize the space inside a greenhouse? The distribution of “areas” should occur before the start of the season, so that by the time seedlings are planted or seeds are sowed, everything is completely ready.

The location of the beds inside the greenhouse should not only meet aesthetics and convenience; their orientation to the cardinal points directly affects the yield of the crops grown. The best option is to extend them along the east-west line, in which case the plants will be provided with sunlight from the south throughout the daylight hours. In this case, it is better to initially place the structure in the same direction, so you will get neat long beds stretched lengthwise.
How to properly distribute the available area for garden beds? Their number and width depend on the dimensions of the greenhouse:
So, in standard polycarbonate structures 3 by 6 m, you can organize three 70 cm beds and leave two convenient 45 cm paths between them. In narrow two-meter greenhouses, it would be optimal to separate two 75 cm strips of soil and paths between them.
 Stationary beds with sides at waist level
 To prevent soil from falling off the beds and water from leaking out when watering, they need to be fenced along a contour buried in the soil:
The deeper the sides are buried, the better it will be for the crops growing in the beds. Their optimal height above the ground level is 3-4 cm, this figure is quite enough to prevent soil and water from “escaping” onto the paths, and at the same time, the limiters will not interfere with you while weeding.

It is better to construct paths after organizing the edges on the beds. The resulting passages can be filled with gravel or crushed stone, or paved tightly and steadily:
The most optimal and durable option for constructing paths in a greenhouse is to fill them with concrete. Solid slabs will prevent weeds from growing on the “paths” and will ensure cleanliness in the structure.

Having a large greenhouse on the plot, I want to use it to the maximum, growing several crops in the beds at once. But, as you know, not all plants are able to get along with each other. Thus, tomatoes, eggplants and peppers require infrequent watering and fresh air, and cucumbers, in turn, urgently need a daily abundant supply of water and constant humidity.
In order to be able to grow “opposing” crops in the same greenhouse, it is necessary to create ideal conditions for each of them - that is, to delimit the available space using partitions. Their arrangement will provide cucumbers with the moisture they need, and tomatoes, peppers and eggplants with fresh, dry air.
To create a partition, you can use the following methods:
The last method is thorough and long-term. If you do not plan to build another greenhouse on the site for complete separation of crops, but want to grow both cucumbers and tomatoes in a warm place, then it is better to build such a partition from polycarbonate.
There are many options that help make work in a greenhouse easier and make the process of growing crops in it more productive. Automated irrigation systems, supplementary lighting, heating, installation of shelving for rational use of the volume of the structure - all this helps to increase productivity.

The use of a shelving system allows you to make maximum use of the volume of the greenhouse when growing seedlings, herbs or low-growing crops.
Shelf growing has a number of undeniable advantages:
The only thing is important condition when organizing rack cultivation - creating a concrete base. The weight of racks filled with pots and containers will be quite impressive; soil or gravel will sag quite quickly under such a load. In addition, the structures should be optimally distributed over the area of the greenhouse so that they do not block the light for other crops. To ensure that everyone is provided with ultraviolet radiation, it is recommended to place shelving along the northern wall, and arrange regular beds in the center and south.
If you decide to build shelving in your greenhouse, carefully consider how much space you can devote to the structure. Having decided on the dimensions of this area and its location, proceed to pouring the concrete base.
Shelves can be made from any materials: you can weld a durable frame from a profile or corners, or make it from timber. Horizontal shelves are usually assembled from boards treated with antiseptic compounds that protect the wood from rotting and fungal development.
The number of shelves and the distance between them are determined based on the maximum growth of the crops that you plan to grow. So, in a standard greenhouse 2 meters high, you can create a rack with 6 shelves for growing seedlings or strawberries; cherry tomatoes and peppers will require more space - the number of levels will be halved.
 Irrigation system
 All gardeners strive to make their work easier and leave more free time for relaxation. One way to reduce labor costs is to install an irrigation system.
You can significantly extend the fruiting period of crops growing in a greenhouse by organizing heating and supplementary lighting; such measures will allow you to harvest crops all year round:
Of course, the installation of such systems is quite expensive, but they can significantly facilitate your hard work on the site and increase the yield of crops grown in the greenhouse.
Another important element that can be built in a spacious greenhouse is a pantry. Agree, it’s not very convenient to carry the tools necessary for work from the shed every time. It will be much more comfortable for you if you fence off a small corner inside the structure where hoes, shovels, watering cans, rippers and ready-made solutions for fertilizing will be stored.
For convenient storage in the pantry, you should properly organize the space by making fasteners for the handles of shovels, rakes, hoes and rippers, as well as by building shelves on which everything you need for working in the greenhouse will conveniently stand: pots, fertilizers, twine and other small things.
Building a greenhouse of the optimal shape and size, selecting high-quality durable building materials is only the first stage in growing greenhouse crops. Arranging the inside of a greenhouse is a very important process and requires close attention. Having studied the basic rules and recommendations, you can learn how to use space efficiently, organize comfortable beds and create conditions for caring for plants.
The internal arrangement of a polycarbonate greenhouse can vary significantly in structures of different shapes and sizes and in those intended for growing different crops. The first thing you need to decide is how the planting will be done: in the ground or in pots on racks.

Types of interior design of a greenhouse
Arranging a greenhouse involves the following key points:
In addition, it is worth considering how the planting will take place: in beds, in pots, etc. It is possible to combine two methods: arrange a garden bed inside and create several stationary shelves, for example, for growing seedlings. Subsequent arrangement is made based on these parameters.
Important! Some crops, such as strawberries, can be grown on racks in plastic bags filled with soil. This not only saves space, but also makes maintenance easier, since there is no need for weeding.
If there are beds in the greenhouse, you need to make one or more paths. To do this, it is necessary to compare the dimensions of the structure and think about their most rational location. For a standard rectangular greenhouse made of polycarbonate of small size, for example, 2 * 6 m, it will be enough to have one path in the center from the entrance, and place beds on both sides of it. At the same time, the width of the latter should ideally be 80-100 cm, but no more, otherwise the maintenance process will be difficult. The width of the track can be any, based on your own needs. Usually, on average, they adhere to the parameter 40-50 cm, since a smaller size will create inconvenience, and with a larger size, the path will take up extra space, which is better allocated for planting plants.

Planning beds in a greenhouse
A larger greenhouse may have three or more parallel beds with passages between them. If the greenhouse is square or has another non-standard shape, which can easily be made from polycarbonate, you can arrange the beds above the walls. From the entrance you will need to draw a path to the center and a slightly smaller one deep into the beds.
The beds are usually located at a height from the level of the paths (up to 30 cm). To prevent soil from spilling onto the latter, the beds need to be fenced off. The easiest way is to lay boards. This can be done in any way. For example, you can make a small depression, insert a board sideways and dig it in. Another method is done this way:
1. Drive small but strong pegs along the path;
2. Insert the board so that it rests on the pegs;
3. Install additional spacers on the other side of the board.

Arranging beds in a greenhouse
In any case, the wood must first be treated with antibacterial and antifungal agents to reduce the likelihood of rotting. The sides can also be made of brick, curbs or other more reliable floors can be laid.
The arrangement of the beds itself occurs in several stages. The initial layer should be made of drainage, which will help retain moisture. It is sometimes poured onto a layer of film, which creates an additional barrier and helps retain heat and moisture in the soil. Soil is poured onto the drainage. Typically, fertile, saturated soil is chosen, which will need to be additionally fertilized with mineral or natural substances. For some plants, turf is better, for others - sandy loam soil, so you need to lay the soil that is optimal for a particular crop.
Important! If a warm floor is installed in the greenhouse, it must be laid under all layers of the bed, including drainage. Under the heated floor pipes, it is necessary to lay a layer of thermal insulation, which can be polystyrene foam or foil film. They help retain heat inside the soil without letting it pass deeper.
Plants are often grown on racks in polycarbonate greenhouses. This allows you to significantly save space by placing several tiers and increase productivity per 1 sq.m. In this case, the arrangement of the greenhouse inside will be significantly different. First of all, you should prepare the floor. The main requirements for it: able to withstand significant weight, be smooth and durable. Therefore, it can be laid with tiles or bricks, filled with concrete, etc. Moreover, if the racks are massive and spread over the entire width of the greenhouse, their legs can be cemented into the floor to give the structures greater strength. If there are several small shelves in the greenhouse, for example, for seedlings, this will be superfluous.

Greenhouses equipped with shelving
Racks can be built from wood, pre-impregnated with special solutions, metal corners or profiles. Height and width are selected according to individual needs. They depend on the height of the person providing care and the characteristics of the crops grown. It is not recommended to make many shelves, otherwise plants located at lower levels will receive less light. The topmost shelf should be placed no higher than a person’s eye level, or better yet, a little lower, so that without a ladder or stand you can reach the opposite edge of the shelf. Sometimes the top shelf is made higher to store inventory or some improvised materials on it. On average, for a greenhouse 2 m high, it is recommended to make structures with 3-4 shelves, depending on the height of the crop being grown. A rack for seedlings can have 5-6 shelves.

Rack for growing seedlings in a greenhouse
It is better to place racks along the walls so that the plants get as much light as possible. It is necessary to leave space for passage between rows of racks. Its width should be 40-50 cm. If you make it yourself or buy ready-made racks on wheels, you can move them inside the greenhouse. You can also turn them over with the opposite side facing the transparent polycarbonate wall so that the seedlings grow more evenly and receive the same amount of light.
An arched greenhouse is often made from polycarbonate. Arrangement inside it occurs in the same ways as described above, depending on the placement of plants.
For a large greenhouse, especially a heated one, it is recommended to equip a kind of vestibule. It will serve as an obstacle to cold air entering the greenhouse, and also perform a practical function: you can store tools, equipment, fertilizers, and pest control products in it.

Greenhouses equipped with vestibules

This list lists (in alphabetical order) various periodicals (specialized magazines, etc.) by...

Quite often the word “profession” seems to be attached to an established social group of people with common interests...

The commercial director is one of the key figures in any large company, he is the second person after the chief...

Document title: Merchandiser Resume Format: .docx Size: 76 kb Experience For the specialty "merchandiser" it is not so...

A report on the work done will allow the manager to assess the quality and speed of the secretary’s work. The article contains sample reports...

| Partner of companies. Mandarin Invest and Excelance, Moscow. Pavel Luksha – strategic consultant, researcher...
Added to the site:1. General provisions1.1. The fitter is a worker and subordinates...

Plan: 1. Characteristics and nutritional value of raw materials. 2.Mechanical culinary processing of poultry and game...

1 slide 2 slide 1. Formation of a totalitarian regime. 2. Ideologization of public life. 3.Formation...

Professional, hardworking and loyal employees to the organization are something without which business development is impossible....

* Offer valid for legal entities * Receive a personal commercial offer from the manager...
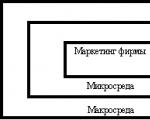
INTRODUCTION THEORETICAL FOUNDATIONS FOR RESEARCH OF THE MARKETING ENVIRONMENT 2 Internal environment of the enterprise MAIN...

Baba Yaga from fairy tales still scares children - he will come, carry away and eat. She also appears in works for...

Fans of flying pigeons know the Baku breed very well. Many have considered her the best for many years in a row...

Quite often the word “profession” seems to be attached to an established social group of people with common interests...

The commercial director is one of the key figures in any large company, he is the second person after...