Rate of return ratios
At a certain price level, a reduction in costs leads to an increase in income, i.e., the reverse side of costs...
Among the many techniques for working with paper, origami takes a well-deserved place. From simple sheet With paper you can make all kinds of crafts, toys, beautiful and useful things. At any special moment, an origami envelope can become indispensable, which can be used as a gift by putting money or decoration in it.
 An origami envelope is one of the most common paper products, and there are many ways to make it. You can use any paper for this: regular paper from an album, colored, vintage, textured, glossy. In order to make the simplest envelope, you need to take a sheet of A4 paper and measure 72 mm at the bottom left and top right.
Draw straight lines from the corners to the marked points and trim off the excess paper. You will get a rhombus, which will be the basis of the future product.
The side corners must be folded to the center, and the bottom corner must be placed slightly higher than the side corners. Each bend should be fixed using a ruler. Then glue the edges of the bottom folded corner to the other two folded corners, and the envelope is ready.

A more complex option requires step-by-step instructions:

An envelope for a birthday or a wedding will be even more beautiful if you use scrapbooking when making it, that is, decorate the product with paper cuttings, small photographs, flowers from various materials, rhinestones, beads. Such additions will give the item mood, depth and originality.
In Japanese traditional style, you can make an origami envelope for money. At first glance, this is an ordinary envelope, but if it is made from bright gift paper, the packaging for banknotes will turn out to be far from banal. A wallet made of two-color paper will look very original.
Step by step instructions:

An envelope wallet for money should be made of beautiful gift paper so that it shines, shimmers, pleases the eye and remains as a keepsake even after there is no money in it. But the paper we are interested in is usually thin, and therefore it can be used to cover the top of the product.
 For various small things (hairpins, elastic bands, jewelry), it is sometimes difficult to find packaging that matches their size and can perfectly complement the gift. An envelope with a surprise is exactly what you need. This is one of the original techniques for making origami envelopes, which are needed to put various little things in them. In Japan, the birthplace of origami, many centuries ago, when there was no trace of envelopes, such envelopes were used to send letters.
It was believed that such a letter would definitely reach the addressee, since only someone who was well acquainted with the origami technique could read it. It’s not at all difficult to make an envelope with a surprise yourself according to the diagram and description. You can make it in the form of a crane, a star, a decoration, a heart-shaped or an envelope for a music disc, which it is advisable to decorate with multi-colored stones or beads.
An ice cream-shaped envelope works very well as gift packaging. To make it you will need good cardboard and patterned paper.
Step by step instructions:


Gifts packed in such wonderful surprise envelopes will be a pleasant surprise for loved ones and will provide them with a lot of pleasure.
An origami heart envelope can be given as a “Valentine” by putting some goodies inside, or used as a beautiful and original packaging for a birthday gift for a loved one. You can please your friend with a beautiful message or expensive jewelry. It will take very little time to make an origami heart according to the scheme of the famous Japanese master Fumiaki Shingu.
Diagram of an origami envelope in the shape of a heart:

Creating origami crafts is a very interesting activity for both adults and children. They provide an opportunity to bring various creative ideas to life, develop imagination and allow you to usefully spend your free time.
Envelope- This is just a shell or packaging for inserting various objects or papers. Basically, we are used to thinking of an envelope as a “packaging” for letters or documents. But there are also envelopes made of thick fabrics or blankets for newborns.
Today we will learn how to do envelopes for different needs and let's start, perhaps, with the most common envelope - a paper envelope.
The simplest envelope can be made from a square sheet of paper by folding the corners towards the center. To do this, you will need a square sheet of paper of the desired size, a ruler and a pencil.
1) Check the very center of the sheet point, measuring the distance to it using a ruler.
2) Fold the left and right sides inward so that the corners touch center point.

3) Then fold the bottom side up so that it covers the center and can be glued to two already folded corners.

4) Apply glue to the bottom sides of the envelope as shown in the photo. You can also use double-sided tape.

5) Fold the top corner down. The envelope is ready! This envelope can be made in just a couple of minutes. It is based on the simple principle of adding angles. Here are a few more schemes for making envelopes from sheets of different shapes:

Diamond envelope

Envelope "from the heart"

Envelope with a square
To make your envelope look beautiful and original, it can be made from several types of colored paper. The most in a simple way Envelope decoration is to use different types of paper for the outside and inside.

To work you will need:
- 2 sheets of colored paper
Old envelope as a template (optional)
Double-sided tape or glue
Ruler and pencil
- Scissors

Let's get started:
1) Cut from a sheet of colored paper blank for the outside of the envelope. To do this, you can use a ready-made template, or draw a template yourself using a ruler and pencil. Choose the size of the envelope at your discretion, depending on what you are going to put in it.

2) From another sheet of colored paper, cut out blank for the inside of the envelope.

3) The inner part should match the size of the outer part, but should be slightly smaller so that it can be easy to stick inside.

4) Using tape or glue, glue internal part.

5) Fold the edges of the envelope inward and seal them so that to prevent glue from getting into the inside.

With this template you can make envelopes from colored cardboard:

By adding a ribbon, you will have envelopes for different occasions: For greeting cards, money, invitations, etc.

Sample long envelope:

Envelope template on A4 sheet:

You can decorate envelopes colored lace or appliqués:

Can be used beads and threads to close the envelope:

Envelopes are sometimes decorated with various paper parts, made in various techniques: origami, quilling, scrapbooking, etc.

More details about quilling technique you can read.
More details about paper flowers you can read.
What could be more banal? gift in the form of money, but sometimes this is the only thing that comes to mind. To make your gift unique, you can place it in handmade envelope. The envelope can be beautifully decorated and signed like a postcard.

Money envelopes are usually made of cardboard and have an elongated shape so that the bill could fit in it completely. You can draw the templates yourself or use ready-made templates:


We offer you some useful ideas on how to make and decorate money envelopes that will become great gifts along with their contents.
Going to a birthday, wedding, christening or other event? Then an envelope for money will come in handy! This original handmade gift will definitely please your loved ones.
Option 1:
This simple money envelope can be made from colored paper in several colors and satin ribbons. It looks very festive, and its production will not take you much time.

To work you will need:
- 2 sheets of colored paper (one with a pattern, the other plain)
Ruler and pencil
Satin ribbons in 2 colors, 1 cm and 0.5 cm wide
Matches or lighter
- Scissors

Let's get started:
1) Prepare paper and ribbons so that they match each other in color scheme. The author of this master class used to make an envelope regular wallpaper, the trimmings of which remained after the repair.
Before you begin, measure desired size envelope, its width and length. In this case, a rectangle of plain paper was used measuring 20 by 40 centimeters. Fold a sheet of paper with the edges inward in the center, as shown in the photo:

2) Fold sides inward to the center.

3) Unfold the sides and fold in the corners in the form of a triangle.

4) Unfold the envelope and stick on a rectangle of colored paper measuring 20 by 23 centimeters in the center of a sheet of plain paper.

5) Fold superfluous inside the envelope.

6) Side corners in the form of triangles stick with glue to the bottom of the envelope.

7) Satin ribbon 1 centimeter wide glue in the center on the back and front of the envelope, leaving the ends to make bow.

8) Place a narrow tape over the wide one 0.5 centimeters wide, also leaving the ends for the bow.

9) Process the ends of the tape fire so that it doesn't fall apart.

10) Tie ribbons with a bow. Your original money envelope is ready.

Option 2:
Envelopes for money or other surprises can be made not only from paper, but also from fabric. We invite you to learn how to make an original gift felt envelope, in which you can place money or a discount gift card.


To work you will need:
- Several small sheets of colored felt
Thick wool thread for knitting
Buttons
Ruler and pencil
Pins
- Scissors

Let's get started:
1) Using a pencil and ruler, measure width of the future envelope depending on what you put in it. If it will be a discount card, attach it to the felt and measure on both sides 1 centimeter for seam.

2) Cut rectangular piece of felt, then bend the lower part and pin it with pins. Insert the card inside to determine the size of the lid.

3) Cut off the top superfluous.

4) Finish the edges with threads, making U-shaped stitches. It is better to use threads in a contrasting color.

5) Cut out of green felt three small Christmas trees or any other details.

6) Glue the Christmas trees with back outside of the envelope. Sew small buttons on the tops of the trees.

7) From the outside of the front of the envelope at the bottom sew on a button, and attach to the edge of the lid threads so that the envelope can be closed and tied with a bow.

This envelope using the scrapbooking technique is easy to make at home using parts cut out of paper. Scrapbooking– a technique for decorating photo albums, as well as various other products using paper applications, beads, etc.

To work you will need:
- White cardboard (23 by 23 centimeters)
Colored paper (23 by 20 centimeters)
Colored paper of a different shade or pattern (8 by 14 centimeters)
Plain thin white paper or thin lace
Satin ribbon 35 centimeters long
Details for decorations (butterflies, rhinestones, beads, etc.)
Ruler and pencil
Matches or lighter
Sewing machine and thread
- Scissors
Let's get started:
1) Using ready-made template, cut out of white cardboard blank for the future envelope.

2) Cut out of colored paper two rectangular blanks , which will match the tops of the envelope. The blanks must be by a few millimeters less base so that they can be easily glued and so that they do not extend beyond the edges.

3) Cut out from paper of a different color two more blanks of the same width, but shorter - this will be the middle of your envelope.

4) Glue on the sides of these parts lace frill. You can use paper lace or very thin lace ribbons.

5) Glue the lace parts to larger colored parts.

6) Glue all the parts to outside of the envelope on the outer main cover and on the inner cover. Then go around the edge with your sewing machine. zigzag seam. You can also glue the colored part onto the back outer side of the envelope, and then process it on a sewing machine.

7) Before gluing the colored part to the back, insert between the part and the base satin ribbon.

8) Tie the ribbon in front with a bow and glue it on the outside over the ribbon rectangle of thin white paper with an inscription.

9) The final touch: decoration additional details.

The best wedding gift is money that can be placed in beautiful envelope self made .

To work you will need:
- A sheet of white thick A4 paper
Light colored paper
Decorative cord
lace ribbon
A piece of thin translucent fabric
Details for jewelry (flowers made of fabric or paper, pendant in the form of a key, beads, etc.)
Double sided tape
Ruler and pencil
Sewing machine and thread
- Scissors (regular and curly)

Let's get started:
1) If your colored paper is not very thick, glue it on a sheet of white paper A4 format and let dry well.

2) Using the template provided or any other template, draw on the back of the sheet outlines of the future envelope and make a pattern. The folds are indicated by the blue dotted line.

3) Cut out the pattern. You can use curly scissors.: tie the ribbons and cords with a bow, make a flower from transparent fabric, attach a cord to the key-shaped part.

9) Glue the lace tape at the top of the part, grabbing the lace, which will wrap around the envelope, so leave a suitable length for this. Glue decorations to the bottom triangular edge of the piece.

10) To be safe, go over the line glued lace tape.

11) Glue the part to outside of the lid envelope.

12) Wedding envelope for money is ready! Inside it will look like this:

With envelope design you can place the money inside in different ways. Here are some ideas to help you make original envelopes. For example, you could use postcard, inside which paste a small envelope with money. You can write wishes on a card, and, looking inside, the recipient will find there cash gift.

Another option is to make the envelope also in the form of a postcard, and inside attach satin ribbons that will hold the bills.

Book of envelopes. This original idea will appeal to those who would like to learn how to save money. You can make some simple envelopes and sign them, indicating the purpose for which the money is stored in them and the time when it can be spent.

Compact discs require careful handling, so it is better to place them in special cases, boxes, envelopes, or store them in a disc album. You can do simple ones CD sleeves yourself from paper.

To work you will need:
- A4 sheet of paper
-Glue
Let's get started:
1) Place the disc to the bottom of the sheet.
2) Fold the sides of the sheet in straight lines, using the disk as a guide.
3) Bend the disc with the paper up, turning it over to the other side.
4) Fold the top part, closing the disc inside the envelope.

5) Take the disc out of the envelope and glue it internal parts so that there is a pocket for the disc.
6) Fold down and inward cover corners.
7) Insert the cover inside the pocket.
8) The simplest CD envelope is ready!

If you want to do congratulatory CD envelope, then you can use the previous tips for making envelopes, only make the envelope large enough to fit the disc. Here some examples original gift envelopes for discs:


Despite the variety of finished printed products, a do-it-yourself origami paper envelope, like any other hand made, is always appreciated and attracts attention. Money, a greeting card and even a mini surprise will be elegantly packaged and will delight the recipient, thanks to the ancient Japanese art. Each message has its own model, for example, on Valentine’s Day it is customary to give a variety decorated with a heart, and small gifts are “hidden” in a special envelope with a double bottom.
Gone are the days when every home had stacks of postal envelopes. Letters are now written exclusively electronically, and messages are sent to family or friends through numerous instant messengers. But if necessary, it doesn’t cost anything to fold an exclusive origami envelope in a few minutes. You can use both special paper and packaging paper, for example, “borrowed” from the main gift, craft paper, and even a piece of wallpaper from an old renovation stock.
You will need one square sheet with a side of 21 cm. It will make a universal envelope for both a monetary gift and a postcard.
Step by step instructions:

Based on this simple model, you can make a charming origami envelope with a bow that even beginners can do.
The Japanese often make decorative ziplock bags out of paper called tato. You can put souvenir coins, magnets, jewelry and other relatively flat objects. The package does not open on its own and reliably keeps its “secret”. It looks original and stylish, and after the gift is removed, it can be used as a Christmas tree decoration or a pendant to decorate the interior.
In the Russian-language version, the tato bags were nicknamed “Windmill” due to the similarity of the lock on them to a children’s toy windmill. This origami envelope is best made from paper with two different colored sides.
Step by step instructions:


Origami envelopes with a surprise are made based on special Japanese menko cards. Their peculiarity is the presence of a double bottom, which allows you to hide a miniature gift or a secret note. For the model you will need a square sheet of paper measuring 21x21 cm.
Step by step guide:


The result is an unusual model with two “compartments”, like a purse. You can put a gift in one, and a congratulatory note in the other. Ready-made origami menko envelopes look sophisticated, especially if made from paper with an oriental pattern:

Mini models are often used for jewelry:

A “heart” theme is a traditional choice for Valentine’s Day, but it doesn’t have to be limited to just this holiday. Any note with warm words of love will touch the recipient even more if it is enclosed in an origami envelope decorated with a heart. Its design is simple, so the folding process will not take much time. Even in the morning, while running off to work, you can have time to make a “message” and leave it on the table or refrigerator door.

You will need a rectangular sheet, A5 or A4 format, if you need an envelope for a standard postcard. It is advisable to use paper with differently colored sides.
Fold the sheet in half along the long side and open it. Bend both upper corners towards the central axis. Turn the workpiece over. Fold the bottom part up along the fold line indicated in the figure. Return the model to the front side. Bend the sides towards the middle line.
We open the outer corners and, using the reverse fold, bring them inside the figure. Turn it over to the reverse side. We fold the upper part into a “valley” along the line indicated in the diagram. We bring the outer corners of the already developed “heart” inward. We bend the inner ones. The origami envelope is ready. Notes or postcards are placed in the pocket under the “heart”.
An origami envelope decorated with an elegant leaf will be appropriate for any occasion: anniversary, wedding anniversary, declaration of love, gift to loved ones or friends. It is also suitable for effectively presenting money. The model is assembled without glue, from one sheet of A4 paper.
In Japanese culture, it is customary to treat gift wrapping with great care. Even the most beautiful and valuable things, if not wrapped and tied properly, will not only not bring joy, but will also be perceived as an insult. Each case has its own packaging, bearing a certain symbolism. It could be good wishes, expression of gratitude, respect, admiration and so on.
One of the most popular gifts among the Japanese is money, which is usually placed in special envelopes - noshi-bukuro. Similar packaging exists all over the world, but the inhabitants of the “Land of the Rising Sun” have brought it to perfection. It is thanks to the envelope, which is a work of decorative and applied art, that money is perceived as a full-fledged gift, and not as a way to show a minimum of attention.

For noshi-bukuro envelopes, handmade washi paper is used, which is classified as an intangible item. cultural heritage UNESCO. Thanks to a unique manufacturing technology that originated in the 8th century AD. e., the sheets acquire an expressive, noble texture, their quality is considered unsurpassed. The envelope must be decorated with mizuhiki knots made of thin colored twine. This is not just an exquisite decorative element, but an encrypted message. Depending on what event was the occasion for a monetary gift, the weaving combines different colors and patterns. Etiquette in this regard is so complex that reference books are published with recommendations from specialists.
To make life easier for modern Japanese who want to give money, they sell special handmade kits for folding beautiful envelopes, which already have everything they need - from paper and diagrams to a suitable mizuhiki. The packaging, like classic origami, does not use glue; it is held in place only by carefully thought out folds. The cost of the finished envelope should be no more than 2% of the amount invested inside. For example, with a package price of 100 yen (about $1), you will have to give at least 5,000 yen.
This MK is for those who value originality even in small things. Now we won’t buy envelopes for money either, but will make them with our own hands - with soul!

Origami envelope with leaf part 1

Origami envelope with leaf part 2

Origami envelope with leaf part 3

Origami envelope with leaf part 4
This is what a finished origami envelope with a leaf looks like:

Origami envelope with leaf
Origami envelope is one of the most popular paper origami. If you don’t know how to make an origami envelope, then on this page you will find everything you need to assemble this simple paper figurine.
In the first photo you can see what you will get if you follow the assembly diagram below. The second photo of the origami envelope was taken by one of our site users. Its design is somewhat different. If you have photos of origami you have collected, send them to: This address email protected from spam bots. You must have JavaScript enabled to view it.

Below is a diagram of how to assemble an origami envelope from the famous Japanese origami master Fumiaki Shingu. If you strictly follow the instructions, then assembling the origami envelope will not take much time, and the result will be the same as in the picture. After doing what is described in the diagram several times, you will understand how to make an origami envelope quickly and without looking at the diagram.

Assembling an origami envelope may seem like a daunting task for beginners. Therefore, we advise you to enter the query “origami envelope video” on the largest video hosting site on the Internet, YouTube. There you will find many different videos about origami envelopes, which clearly show the steps to assemble the envelope. We hope that after watching the assembly master class video, you will have no more questions about how to make an origami envelope.
After watching this video, you will learn how to assemble a simple and very original paper envelope:
And here is another good video lesson on assembling origami envelopes:
In the minds of the majority, an envelope is a symbol of news, communication, connection. It is associated with the transfer of information. In addition, in many cultures the image of an envelope is strongly associated with the concept of money.
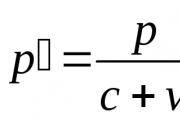
At a certain price level, a reduction in costs leads to an increase in income, i.e., the reverse side of costs...
The government has made a decision that all accountants will experience for themselves in 10 days. Namely: now, in addition to SZV-M...
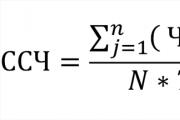
It will be necessary to calculate the average headcount for 2016 in several cases. Firstly, to fill out the information...

Any enterprise operates in a macro- and microenvironment. It has a whole range of resources that are used in...

Methodological development of a literary reading lesson in 3rd grade (UMK “School of Russia”) “L. N. Tolstoy “Shark” Work on...

Information technologies are penetrating various areas of business at such a speed that it is sometimes difficult to assess their relevance....

A damp, cold wind blew from the sea, carrying across the steppe the thoughtful melody of the splash of a wave running onto the shore and...

Quality, quality, quality... How differently this concept is perceived and defined! In Fig. 1...

On September 13, 2012, in connection with the retirement of Stanislav Vladimirovich Khramenkov, the new general...
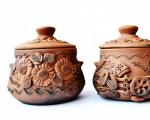
The history of pottery knows two main types of pottery wheels - hand and foot. Both of them work...

Every year hundreds of nurses study to become cosmetologists. After training with people with secondary medical education. There are three education...
Kazakova Daria, Emelyanova Ksenia, Sidorin Andrey Relevance of the topic: every little child loves it when...

The Gazprom Corporation is one of the largest players in the Russian and global economy. How is it organized...

Modern Russian culture of the 21st century requires multilateral and in-depth consideration. She is in close contact with...

The government has made a decision that all accountants will experience for themselves in 10 days. Namely: now...
It will be necessary to calculate the average headcount for 2016 in several cases. Firstly, to fill out...