Organization of emergency management Organization of emergency management
Submitting your good work to the knowledge base is easy. Use the form below Students, graduate students, young...

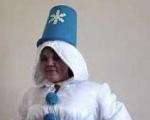
Dobby the Elf from the famous Harry Potter saga is a character known all over the world. His appearance is very unusual and interesting. In this master class we suggest you make a Dobby doll from polymer clay with your own hands.
Materials
To make a doll with your own hands, you will need:

Step 1. On a piece of paper, draw what your doll will look like. Make the drawing in full size of the future product.
Step 2. Cut a piece of thick copper wire. From it you will need to make a doll frame. Form the skeleton of the doll, which will support the head and become a kind of spine, from two parts of wire twisted together with turns of moderate density. The doll's legs and arms are single pieces of wire.

Step 3. Roll a ball out of foil. This will be the base for sculpting the doll's head.
Step 4. Using thinner aluminum wire, form small parts of the Dobby doll, such as toes and fingers. Attach them to the existing frame.
Step 5. Wind aluminum wire along the entire length of the resulting frame to strengthen it.
Step 6. Sculpt pieces of polymer clay on top of the foil ball until you get the base. desired size and shapes.
Step 7. Using a clay needle, mark the locations of the eyes, nose and mouth.

Step 8. Sculpt the doll's nose from clay, giving it the shape of a long triangle.
Step 9. Attach two large balls to the sides of the nose and add strips of clay to the upper and lower eyelids.
Step 10. Add a little clay to the cheek area and distribute it evenly with smooth movements.
Step 11. Form the lips from elongated layers of polymer clay, add some material to the surface between the lips and nose, as well as for the chin.
Step 12. Use the tools to give Dobby's face characteristic wrinkles. Using a brush dipped in alcohol, smooth out all the unevenness and roughness on the doll's face.
Step 13. Place the prepared head in the oven for 20 minutes at 130 degrees Celsius.
Step 14. From large layers of triangular polymer clay, form the elf’s ears and give them characteristic curves.

Step 15. Form hands from polymer clay and place the workpiece in the oven for 20 minutes at the same temperature. Then sculpt the elf's fingers.

Step 16. Repeat steps similar to step 15, forming the doll’s legs.

Step 17. Color Dobby. For lips and skin, use peach and pink shades. Add depth to wrinkles using brown paint.
Step 18. Draw the whites of the eyes and outline the iris with black paint. Paint it with yellow or green paint. Make the pupil black by adding a drop of white paint on top of the tone.

Step 19. Using a drill with a thin drill bit, drill a hole in Dobby's head and attach it to the wire frame.
Print Thanks, great lesson +2
How do you imagine elves, probably the way they are described in fantasy works or depicted by cartoonists. Elves are mythical creatures, no one knows what they should really look like, because they simply don’t exist. But perhaps the most significant distinguishing feature of the elf as a mythical creature is its long, pointed ears. In this sculpting lesson, we will reproduce our elf man, remembering that he should have bright hair of some unusual color, such as green, purple or pink. Also, this character should have a kind face and massive hands.
Other lessons on the topic of gnomes, elves, wizards:We will sculpt the exposed parts of the elf’s body, like those of a human, from beige plasticine. Make a ball.

Place a very small nose in the center of the ball. Attach the eyes a little further away.

Add pupils with white highlights. Make a smile with stacks. A few rays of wrinkles near the eyes will also complement the good-natured facial expression.

Glue on thin eyebrows. Attach the ears, pointed at the tips.

Use any bright plasticine to create a tousled hairstyle. For example, use purple plasticine. Roll a lot of oblong sausages and stick them on the bald part of your head.

To create the lower part of the figure, prepare some kind of bright ball, beige cylinders and elongated shoes, curved up at the ends.

Attach the legs to the ball, add boots.

Attach the upper part of the body, add arms, it is advisable to make the hands disproportionately massive to show that the miniature elf has sufficient magical power.

Attach the head.

This is such a fantastic figurine of an elf, this guide is not universal, because you can make your own craft using different colors of plasticine, dressing the little man in different clothes.

It's just around the corner new year holidays. It's time to prepare gifts. Handmade souvenirs are a piece of the master’s soul, which is why they are most valued. Christmas Elf, made with your own hands - on the New Year's table. If you like to sculpt, then this master class is for you. Elves made polymer clay They will also become an unusual decoration for your table.
Watch the master class...
How to make an elf with your own hands

Making the elf's hands. Roll out the white clay into a sausage and cut it into two parts. Roll out the green clay thinly and cut into strips. We wrap the white sausage in three stripes and bend it in the middle by about 90 0. We slightly narrow one end of the sausage.

Using flesh-colored clay, we make brushes and attach them to the hands. We glue the finished arms to the body. To stabilize the head, attach a toothpick to the center of the body. We wrap it with a white collar.

All we have to do is make the elf's head. To do this, form a ball from flesh-colored clay. Glue a small ball in the center of the head and flatten it slightly to form a nose. Using a stack we will make the nostrils and mouth. Using a thin brush and acrylic paints, draw the eyes. To make ears, roll up a droplet, press on both sides and on the blunt side, and use a stack to make indentations. Glue the ears to the head.

Next, we’ll make the elf’s hat. Let's roll out a drop of red clay again. We press the end of the droplet on the blunt side with our fingers inwards so that the cap fits well on the head. And stretch out the opposite edges a little to make ears.


Submitting your good work to the knowledge base is easy. Use the form below Students, graduate students, young...

We need help to understand the following question: how to correctly reflect a personal supplement in the staffing table. I'll explain...

Send this article to my email In order to effectively manage retail businesses also...

Education and career exhibitions provide ample opportunities for those who want to learn about training programs and...

Competitive and educational program “Along fairy tale paths.” Goal: To consolidate and expand children's knowledge about fairy tales....

Program updates The basic ITS service is to receive regular updates to 1C programs. Information about updates...
Let me present to your attention the integrated musical and sports entertainment “Secrets of the Winter Forest”...
K. D. Ushinsky “Alien Egg” Early in the morning old woman Daria got up, chose a dark, secluded place in the chicken coop,...

In the new edition 1.5 of "1C:Accounting 8.0"*, released in October 2005, the functionality has been significantly expanded...
In the mid-30s, perhaps, there was no fighter that would have enjoyed such wide popularity among...

This becoming can be said to be a transformation of becoming My enemy, fear me. The form is the same, only the content is tailored to...

Send this article to my email. Accrue a premium in 1C ZUP - a standard operation provided for...
Growing champignons is not that difficult, but it requires strict adherence to certain rules:...
66 years old, New York: If you photograph war honestly, the result is anti-war photography. There is no need to embellish the truth...

We need help to understand the following question: how to correctly reflect the personal name in the staffing table...

Send this article to my email In order to effectively manage retail businesses...