Who is a librarian? Profession librarian. Disadvantages of being a librarian
There are a great many books in the world. And you probably have a lot of different fairy tales, stories, and collections of poems at home. But...
In PowerPoint, you can add headers and footers to slides and handouts in a similar way as you can in Word. However, the steps to add a footer in PowerPoint are a little different. Here we will show you how to add and edit a footer template for your PowerPoint presentation.
To add a header and footer, click on the Insert -> Header & Footer option, and then a new dialog box will be displayed as follows.

Here you can control what to include in your slides, date and time, slide number, and footer text. Make sure to check the Footer checkbox and enter the desired footer line. If you want to not show this footer text in the title slide template, then you can check Don't show on title slide.
You can also add a timestamp to your slides. You can learn more about how to add date and time to PowerPoint presentations.
You can change the footer template to suit any layout you want. For example, you may want to show a footer only on the header + content of a slide layout or comparison layout, but not on the cover slide. You can do this by editing the Master Slide or PowerPoint Template and then selecting the Footer section. Here you can apply any text style or footer transformation.

Now close Master View using the cross red button and return to normal view. In PowerPoint 2007, editing the footer template is very similar. You can also change how the footer appears on your slides and apply text styles.
Use Sample issue to create and modify presentation handouts. Changes will apply to all pages of printed handouts.
You can change the number of slides per page, page orientation, and slide size. You can also add or remove page numbers, headers, date and time, pictures, and backgrounds.
To open handout options, on the tab View in the group Sample Modes click the button Sample issue.
Changing the layout
In a group Page Options You can specify the number of slides to print on each page, select slide layouts, change the orientation of the output, and set the slide size. To customize the layout as desired, use the options in all three menus: Issue orientation, Slide size and Number of slides per page.

Setting the number of slides per page

Advice: Layout 3 slides contains lines on which event participants can take notes.
Setting the orientation

Adjusting the Slide Size

Changing page numbers, headers, or dates
You can change header and footer settings in the group Fillers. By default, headers and footers are displayed in the top and bottom corners of the Sample Issue page.

Click the alt text ( header, footer, dates or page numbers) to make changes. You can follow the steps below.

Adding a logo and other images to handouts
Open the tab View on the ribbon and click the button Sample issue.
On the tab Insert click the button Drawings or another button (for example, Images from the Internet) depending on where the desired image is located.
Select an image and click the button Insert.
The image will be added to the center of the page.
Drag the image to the desired location and resize it if necessary. Additional formatting options are available on the tab Format section "Working with drawings".
Changing the background
You can change the background of the issue (but not the slides) in the group Background. You can also quickly select a different font for all search text at once, set special borders and visual effects.

Colors. Select a color theme for the SERP background. To see what it will look like, click Background styles and select one of the options.
Background styles. Select a style from the list. The colors displayed depend on what is selected in the list Colors.
Advice: Click Background format at the bottom of the list Background styles to open the area Format, and adjust advanced background options (such as advanced fill options, artistic effects, color and image options).
Fonts. Select a font from the list to quickly apply it to all headers and footers.
Effects. Select a theme effect (shadow, reflection, line, fill, etc.) from the list.
Handout Preview
To preview what your printed handouts will look like, follow these steps:

For more information on working with PowerPoint handouts, see: Video: Working with PowerPoint Handouts
In the sample results, you can move, change the size and format of the headers and footers in the placeholders. Additionally, you can adjust the page orientation and specify the number of slides per handout page when printing.

1 . Indicate how many slides you want to print on each handout page.
2 . Change the size or format of the header placeholder, or move it.
3 . Change the size or format of the footer placeholder, or move it
View handout options
Click the section title below for detailed instructions.
Adding a presentation title or organization name to your presentation slides can be necessary at times. The best way do this to make it part of the header or footer where you can add the text you need and try to make it as unobtrusive as possible.
Step 1: Go to the tab Insert in PowerPoint and click Header & Footer (as shown below).
Step 2. A dialog box will open header and footer. On the tab Slide, click the checkbox Footer field and enter your desired text. From here, you can add date and time to your slides.
Step 3: To display text on the selected slide, click Apply or use Apply all to add text to all slides.
Note: To have text appear on the main slide, select the checkbox "Do not show on title slide" option.

Step 4. Once the text has been added you can edit the text and timestamp using the basic font formatting options on the tab Home.
To add header text, follow the steps above and simply drag the text box to convert the header to a header (as shown below).

To add headers and footers to handouts or notes, follow the same procedure mentioned above and simply select the Notes and Handouts tab from the Headers and Footers dialog box. The specific steps for this process are given below.
Step 1. Go to the Insert tab in PowerPoint 2013 and select Header & Footer.
Step 2. From the Header and Footer dialog box, select the Notes and Handouts tab.
Step 3. Check the Header and/or Footer checkbox, enter the desired text for the notes page or handout.
Step 4. Click the button Apply to everyone.

The header and footer are called header data, placed above or below text on several or all pages of a document. They usually contain the title of the work, part, chapter, paragraph, copyright information, company logo, page number, time or date of creation of the slide, etc.
For slide Microsoft PowerPoint Only the footer can be specified.
Header text, unlike other headings and inscriptions, is repeated on each slide. When you create headers and footers in Microsoft PowerPoint, you don't have to manually type this information on each slide. When you add new slides to your document, a footer is automatically attached to them.
You can access the settings for headers and footers in Microsoft PowerPoint by clicking the Header and Footers button on the Insert tab of the control ribbon. After this, the Header and Footer dialog box opens, which contains two tabs: Slide And Notes and Issues. Let's look at the elements of each tab.
Slide dialog box Headers and footers You can customize the display of headers and footers on a presentation slide. Consider these elements:
In this way you can easily number the slides V automatic mode. When adding or deleting slides, the numbering will automatically be set in accordance with the new version of the presentation, which is undoubtedly very convenient. Also quite a convenient feature is the ability to include the date and time the slide was created directly in the slide footer.
Tab controls Notes and Issues dialog box Headers and footers You can customize the display of headers and footers in the printed version of the presentation. Here, PowerPoint gives you a little more customization options than in the previous case. The difference is the ability to add a header to the page. This is done by checking the box Header and the corresponding input field.
Notice the bottom right part of the dialog box Headers and footers. This shows a schematic view of the headers and footers on a page or slide.
Please note that when print presentation, in addition to the headers and footers installed on the tab Notes and Issues dialog box Headers and footers, the slides' own footers will also be printed.
Use Sample issue to create and modify presentation handouts. Changes will apply to all pages of printed handouts.
You can change the number of slides per page, page orientation, and slide size. You can also add or remove page numbers, headers, date and time, pictures, and backgrounds.
To open handout options, on the tab View in the group Sample Modes click the button Sample issue.
Changing the layout
In a group Page Options You can specify the number of slides to print on each page, select slide layouts, change the orientation of the output, and set the slide size. To customize the layout as desired, use the options in all three menus: Issue orientation, Slide size and Number of slides per page.
Setting the number of slides per page
Advice: Layout 3 slides contains lines on which event participants can take notes.
Setting the orientation
Adjusting the Slide Size
Changing page numbers, headers, or dates
You can change header and footer settings in the group Fillers. By default, headers and footers are displayed in the top and bottom corners of the Sample Issue page.
Click the alt text ( header, footer, dates or page numbers) to make changes. You can follow the steps below.
Adding a logo and other images to handouts
Open the tab View on the ribbon and click the button Sample issue.
On the tab Insert click the button Drawings or another button (for example, Images from the Internet) depending on where the desired image is located.
Select an image and click the button Insert.
The image will be added to the center of the page.
Drag the image to the desired location and resize it if necessary. Additional formatting options are available on the tab Format section "Working with drawings".
Changing the background
You can change the background of the issue (but not the slides) in the group Background. You can also quickly select a different font for all search text at once, set special borders and visual effects.
Colors. Select a color theme for the SERP background. To see what it will look like, click Background styles and select one of the options.
Background styles. Select a style from the list. The colors displayed depend on what is selected in the list Colors.
Advice: Click Background format at the bottom of the list Background styles to open the area Format, and adjust advanced background options (such as advanced fill options, artistic effects, color and image options).
Fonts. Select a font from the list to quickly apply it to all headers and footers.
Effects. Select a theme effect (shadow, reflection, line, fill, etc.) from the list.
Handout Preview
To preview what your printed handouts will look like, follow these steps:
For more information on working with PowerPoint handouts, see: Video: Working with PowerPoint Handouts
In the sample results, you can move, change the size and format of the headers and footers in the placeholders. Additionally, you can adjust the page orientation and specify the number of slides per handout page when printing.
1 . Indicate how many slides you want to print on each handout page.
2 . Change the size or format of the header placeholder, or move it.
3 . Change the size or format of the footer placeholder, or move it
View handout options
Click the section title below for detailed instructions.

There are a great many books in the world. And you probably have a lot of different fairy tales, stories, and collections of poems at home. But...

Success is a lousy teacher. He makes smart people think they can't lose. - Bill Gates Hello...

History of building: Lathes were invented and used in ancient times. They were very simple...

Just a few decades ago, career guidance classes began to be held at the senior level in school. This happened in...

The structure of the housing and communal services management company, its layout and the presence of certain divisions and positions in it depends on the size...

First of all, profit must be considered as an economic category, a scientific abstraction expressing certain...

At a certain price level, a reduction in costs leads to an increase in income, i.e., the reverse side of costs...
The government has made a decision that all accountants will experience for themselves in 10 days. Namely: now...

It will be necessary to calculate the average headcount for 2016 in several cases. Firstly, to fill out...

Any enterprise operates in a macro- and microenvironment. It has a whole range of resources that...

Methodological development of a literary reading lesson in the 3rd grade (UMK “School of Russia”) “L. N. Tolstoy “Shark”...

Information technologies are penetrating various areas of business at such a speed that it is sometimes difficult to evaluate them...

A damp, cold wind blew from the sea, carrying across the steppe the thoughtful melody of the splash of a wave running onto the shore and...
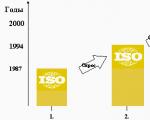
Quality, quality, quality... How differently this concept is perceived and defined! In Fig. 1...

Success is a lousy teacher. He makes smart people think they can't lose. - Bill Gates...

History of building: Lathes were invented and used in ancient times. They were very...