How to write a cover letter for a resume
A cover letter for a resume is a document in which you can present yourself in a more free manner at your best...
From various materials For needlework, you can create all kinds of beautiful accessories and jewelry yourself. Many craftsmen choose polymer clay for these purposes, as it is extremely plastic, easy to work with, and the variety of types allows you to create products in a wide variety of styles. Products made from this material are strong, durable and bright.
Polymer clay is a material that resembles plasticine in its consistency, which, due to heat treatment, hardens and turns into plastic.
There is a wide variety of colors and textures polymer clay. Moreover, colors can be mixed, and paints and glitter can be added to them. This material is non-toxic and therefore even children can work with it.
From polymer clay you can create jewelry such as earrings, beads, pendants, bracelets, etc. With the help of clay, you can bring any ideas to life. It all depends solely on your imagination.
Tips for beginner needlewomen:

To create earrings from plastic, in addition to clay, you will need accessories: earrings, connecting and decorative elements.
Beginners can try making earrings with roses. First of all, you need to pay attention to the structure of the flower, consisting of large quantity fastened petals, large - at the outer base and small ones at the inner base. And then you should prepare the materials:
 First you need to make preparations for future petals. To do this, you need to pinch off a piece of clay, knead it and roll it into a ball. For the outer petals you will need large balls, and for the inner petals - small ones. Then you need to twist a bud from a thin layer of plastic. Each petal must be made from a ball using a stack, giving it a curved shape. Next, you should attach the petals to the bud one by one, adjusting the volume of the flower.
The made rose can be used for decoration. To do this, you need to cut the base and pierce holes for fastening.
The finished flowers must be carefully placed in the oven and baked until ready, and then varnished. After this, the rose can be strung on a pin and secure it in such a way that there are lugs at the bottom and top for fastening with the part.
You need to attach a hook to the top using a ring. On the lower part there is a red bead. It will slightly weigh down the jewelry, and they will hang without twisting.
To create flower balls you will need:

 First you need to wrap the hollow beads with any clay. If there are none, you need to form simple plastic balls of the same size, up to 1 cm in diameter, otherwise the earrings will be too heavy. Then you need to make through holes in the balls using a toothpick.
Next, you need to pinch off a piece of light purple clay, slightly smaller than a pea, and roll a drop out of it. Using a knife blade, cut the drop into four equal parts. Use your fingers to grasp the tip of the drop and, in turn, press each of the cut parts against the fingertip, flattening and forming thin petals. To prevent the plastic from sticking to your finger, before making each new flower, you need to moisten the skin with water or sprinkle it with talcum powder. Then you can make the same flowers from purple and burgundy clay bars.
Then you need to place the flowers on pre-made base beads. Carefully insert a toothpick into the center of the flower and attach it to the surface of the base so that the base beads are completely hidden. If you get a clearing somewhere, you need to fill it with buds. They should be done similarly to a flower: you need to form a drop, cut it into four parts and lightly twist all the parts in one direction. To make the flowers seem more alive, you should roll small balls from yellow clay and place them in the center of the flower.
After which you need to send the buds to the oven for firing. The thinner the petals of the workpiece, the less time they need to be fired. Before starting baking, you should read the instructions.
After baking, you need to degrease the surface of the bouquets. detergent and varnish. When the products are dry, remove the toothpicks and insert cloves with a cap into the hole. And with round pliers you need to make a loop from the rod of the nail and insert the hook.
This process is in composing several reeds with simple designs into a monolithic cane with a complex pattern, which is compressed and rolled out to the required diameter. The result is a lot of beads and products with the same ornament.
To make jewelry you need:

Actions step by step:

Now all the feathers are ready, all that remains is to assemble them into earrings. You need to insert the connecting ring into the hole of the pen and secure it in the hole of the connector.
Thus, using the master class, you can make beautiful earrings from foamiran or polymer clay with your own hands. Whether they will be in the form of a flower ball, feathers or roses - decide for yourself.
Attention, TODAY only!
Polymer clay is a unique material from which you can make various beautiful and original things, for example, earrings. Thanks to the fact that this article will present detailed master class, earrings can be made even by the most novice needlewomen, the main thing is not to be afraid to start.
Jewelry, including earrings, are the most commonly made items made from polymer clay, since every fashionista can create unique jewelry that emphasizes individuality. It’s not difficult to figure out how to make earrings from polymer clay: the video below will introduce needlewomen to all the principles of work.
Flower earrings made of polymer clay , The master class for making which will be offered below turns out bright and elegant. To work, you will need clay of several colors: pink, green and light green, accessories, as well as wires, a knife, a rolling pin and board, wire cutters, a brush, and foil. See photos of the work below the text.
MK includes certain stages. The process of making an earring must begin by deciding the number of flowers that will make up the earring and preparing the appropriate number of stamens. Then the stamens should be attached to the wire and a loop should be made at the end of each wire using pliers. Then you need to start making leaves; for this, narrow triangles should be cut out of a rolled out layer of clay no more than one millimeter thick, light green in color. Then you need to attach these triangles to a wire around each stamen. In order to make petals, you need to form balls from pink clay, then flatten them and form petals. To make the petals look natural, they need to be placed on a sponge and pressed down in the center, you can use a dowel, and then apply red pastel to the base of the petals. Then the petals also need to be attached to a wire around each stamen and leaves.
Next, you need to prepare two pieces of wire about ten centimeters long, make loops at the ends of both pieces and cover these loops with pink clay. Then you need to attach three petals to the loops to form closed buds. Then you need to make leaves from green clay and attach them around the buds. After this, the flowers need to be baked; it is best to place them in a ceramic bowl, after wrapping them in foil. For each branch you should make about five leaves of green clay. The stems for the leaves can be wire, at the end of which you need to make a loop and fasten the leaf to it, then bake the required number of leaves. Once all the elements are ready, you can begin to assemble the product. To do this, you need to prepare a tape and attach it to it, alternating first the leaf, then the flower. When the earring of the required length is assembled, the excess wire can be cut off. At the final stage, you need to attach connecting rings, earrings and other decorative elements. How to make earrings - photos demonstrate each stage of work.

There are several stages of working with polymer clay. If you do everything correctly, according to the instructions, then you will get very good results. original jewelry: beads or earrings made of polymer clay, pendants, bracelets, flowers made of polymer clay, hand-made hair ornaments etc.
On the Internet you can find many lessons on working with polymer clay for beginners, as well as master classes on polymer clay for needlewomen with different skill levels.
We offer you several lessons and master classes on modeling from polymer clay.
This lesson shows in detail how to make rose earrings from polymer clay with your own hands. Everything is not as difficult as it seems. These earrings will suit various outfits in your wardrobe.
Master class: cake earrings
Master class: Dragonfly brooch made of polymer clay
Polymer clay pendant with Swarovski crystals
Master class: making beads from polymer clay

1 Preparing the workplace. Everything you need for your work should be at your fingertips: a knife or blade, a glass surface, a baking dish, templates, toothpicks, a roller for rolling, varnish, accessories, etc.
2 Select polymer clay, select the desired colors, knead the clay well. It must be kneaded like plasticine to make it soft, elastic, and remove excess air from it, because after baking, air bubbles inside the product create uneven bumps on the surface.
3 The clay is cut into pieces necessary for making the product, sausages and balls are molded, and colors are mixed.
4 When your pieces are ready, they should go into the oven. Typically, products baked at a temperature of 110-130 degrees for 15-20 minutes. Carefully read the instructions on the plastic packaging and strictly follow the recommendations on the packaging. Do not exceed the temperature and do not overcook the products in the oven.

There is another method besides baking - boiling the product. To do this, take dishes that you will not use for food purposes and cook the preparations in boiling water. However, remember that not every type of clay can be boiled. Read the packaging carefully. At the same time, baked products are more reliable and durable than welded ones.
5 If the temperature or baking time is exceeded, the product may begin to release toxic poison and burn. If this does happen, thoroughly ventilate the room and wash the oven. Do not bake products in containers that will subsequently come into contact with food.
6 After cooling, the workpiece should be varnished and bonding should begin.
Good luck in making your own jewelry and unlimited flights of imagination!

Not everyone knows what it is, but, of course, many have heard it. Polymer clay is a soft material, very similar in consistency to plasticine. But once such products are heated, they acquire the strength of real plastic. The basis of this clay is polyvinyl chloride (PVC). Clay is also called plastic or plastic.
Buying polymer clay is not that difficult these days. It is usually sold in art salons and similar stores and boutiques. It will be even easier to purchase it online. In many online stores, polymer clay is presented in the widest range. Products self made can also be purchased online. The choice is simply enormous.

Clay jewelry can be universal or suitable for a specific outfit. The theme of the jewelry depends only on the imagination of the needlewoman. By the way, modeling from polymer clay is not such a difficult task. All you need to do is carefully study jewelry making technology from it, and you will also need a little patience, time and imagination.
There are many types of polymer clay. It’s not at all easy for a beginner to understand them. But with desire and persistence, nothing is impossible.
Polymer clay comes in different grades, e.g. imported “Fimo”, “Cernit” and “Sculpey” or domestic “Tsvetik”, “Sonnet”, “Hobby”, “Lapsi”, “Artifact”. The advantage of domestic ones is that they are more low price. And the above imported brands of clay are considered the most convenient to work with, because clay of domestic brands is not so plastic, it can crumble, and finished goods are not as durable. This one is perfect polymer clay for beginners, as well as for those who want to experiment. More information about different types You can find out about clay on thematic Internet resources, as well as on handicraft forums.

Each specific brand of clay has its own characteristics. Firstly, this is the color palette, and secondly, a certain polymerization (hardening) temperature. The range of many manufacturing companies is also surprising. Some manufacturers make clay for the production of dolls, others make translucent clay, clay that glows in ultraviolet light, with sparkles, mother-of-pearl shimmer, etc. Clay that glows in ultraviolet light makes excellent jewelry for girls who love club life.

You need to think about your work surface. It is best if it is a ceramic tile with a glossy surface or a piece of glass. The surface must be durable, since during manufacturing DIY plastic jewelry you will be working with a knife and the surface should not be damaged. Workplace should be smooth so that the clay does not stick.
Next, an important tool when working with clay is a thin, sharp knife, such as a stationery knife, or a regular blade. The smaller the products and parts you make, the sharper and thinner the knife you will need. You should also take care of the tool you will use to roll out the plastic. This may be a special video designed for this purpose.

The product must be baked at high temperature. A regular home oven is ideal for this. You can set the desired baking temperature. For baking, you will need a heat-resistant plate or a special baking sheet, which will be intended only for this. This utensil cannot be used for food afterwards. A metal baking sheet should be covered with parchment paper to prevent the products from burning.
What else is needed to make jewelry from polymer clay?
For more experienced needlewomen, you will need some more products and materials for creativity. Sandpaper different numbers to remove fingerprints and irregularities from the surface of the jewelry, a special cloth to polish the accessory, as well as varnish that makes the product shiny and more durable and durable.
Some stores offer special varnishes for plastic from different companies, the most popular of which is Fimo varnish. If it is very difficult to find such varnish in your city, then you can use ordinary water-based acrylic varnish, which is sold in construction stores, for these purposes.

You also cannot do without special accessories for the jewelry itself: chains, locks, earrings, threads, ribbons, magnets, elastic bands. If you want to do it yourself polymer clay earrings, then you will definitely need earrings - curved arms with a loop on which the earring is attached. Such accessories can be found both on the Internet and in sewing stores and other accessories stores.
On the next page you will read instructions on techniques for working with polymer clay, and also see several video lessons and master classes on making earrings, brooches, beads, and so on.

You don’t have to buy beautiful, bright, juicy jewelry.
You can make them yourself if you master the technique of working with polymer clay.


Now let's learn how to turn our roses into earrings. There are two ways. One of which is simpler, the second is more difficult, but the result is simply gorgeous
Simple earrings made of polymer clay (rose blanks)

Earrings in the form of a bouquet of roses


Polymer clay beads with metal effect


Delicate flowers for decorating hairpins and headbands


A cover letter for a resume is a document in which you can present yourself in a more free manner at your best...

1 of 39 Presentation on the topic: Rules of safe behavior Slide No. 1 Slide description: Slide No. 2...

The law prohibits working without vacation, receiving a cash equivalent instead of the allotted vacation once a year. But it is not...

Joshua Milton - "General Butt Naked": Joshua Milton Blahy, better known as "General Butt Naked"...
In conditions of horizontal differentiation, the buyer's choice is determined by commitment to a particular brand,...

Vertical product differentiation involves the distribution of products in an industry market in accordance with their...

A citizen of the Russian Federation (each individual) is a consumer of state resources: water (for hot and cold),...
In many areas of life there are such concepts as centralization and decentralization. These concepts are included...

Get acquainted with draft orders of management relating to its activities. 3.8. Sign and endorse...

08/23/2019 Every citizen who has an official place of employment has the right to go to. But no one...
1. Working conditions according to the degree of harmfulness and (or) danger are divided into four classes - optimal,...

Decree of the Government of the Russian Federation dated April 30, 2013 N 382 (as amended on October 1, 2018) “On holding a public...

Corvette "Boikiy" (hull number 532) is the third in a series of Project 20380 ships built by JSC...
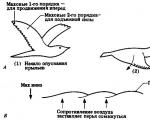
Let's consider the horizontal air flow relative to the inclined surface of the wing in the case when it...

1 of 39 Presentation on the topic: Rules of safe behavior Slide No. 1 Slide description: Slide No. 2...

The law prohibits working without vacation, receiving a cash equivalent instead of the allotted vacation once a year. But this...